.svg)
How to Set Up Pre Order on Shopify in 2026 (With & Without App)
Last updated on
May 15, 2026
%20(1)%20(1).avif)
Maximum sales with minimum risk – that’s exactly what Shopify preorder stands for. Especially with new launches, limited edition items, and made-to-order products, preorders are a great way to understand customer demand and invest cautiously.
That is why setting up pre orders on Shopify is a smart move for store owners who don’t want to lose sales during stockouts or product launches.
The best way to offer preorders on Shopify is by using a preorder app with advanced features and support. But if you are into coding, then you can do it without an app. In this article, I will guide you through the complete preorder setup with and without using a preorder app. Read along to know effective preorder strategies to make your Shopify store a success.
Why choose Shopify preorder for your next launch
There are several reasons why preorders are considered a great Shopify strategy among business owners.
Understand market demand
With a new product, store owners are always in a dilemma - stock up as much as possible or play it safe with minimum stock?
With preorders, you can be certain of market demand and your customer requirements. This helps minimize your financial risks and gives you time to focus on other potential products. If the preorder numbers are lower than what you expected, there is space to find the ‘why’ behind it and the ‘what’ needs to be done to make it right.
Keep selling with zero inventory
Preorders come in handy not just for new launches but also to keep selling even when products go out of stock. There is absolutely no need for you to stop making profits when you know there is demand for your product.
Personalization & customization
For made to order products, such as a wedding cake or personalized gifts, you need time and resources to get the finished products. For such instances, preorders add value to your store and give you enough time to create a customized final product.
Better cash flow
With preorders, you can either collect the full amount upfront or just a deposit from your customers. This money, in turn, can be used to pay back your manufacturer or cover your raw material costs without you having to invest from your own pockets.
How to set up pre order on Shopify
Step 1: Get the app
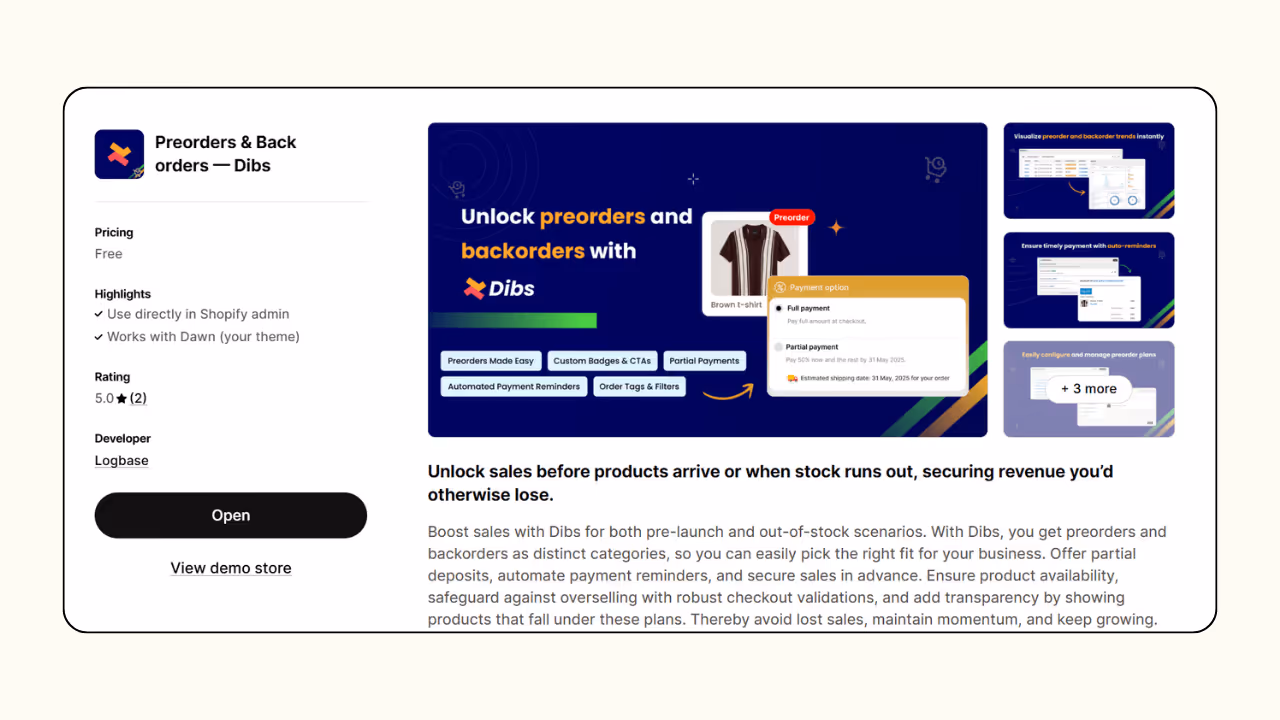
Start by installing the Dibs - Preorder & Backorder app on your Shopify store for free. Dibs is one of the best Shopify preorder apps with advanced and user-friendly features. Easy to create preorder campaigns in minutes with no prior coding or technical knowledge.
Key features of the app:
- For every preorder, you can set a quantity limit and even schedule your campaigns.
- You can create preorder campaigns for new launches and offer backorders for high-demand SKUs.
- Dibs lets you offer flexible payment options for preorders & backorders.
Step 2: Create a plan
From the Dibs app, navigate to Products & plans. Under preorder, click on Get started.
.avif)
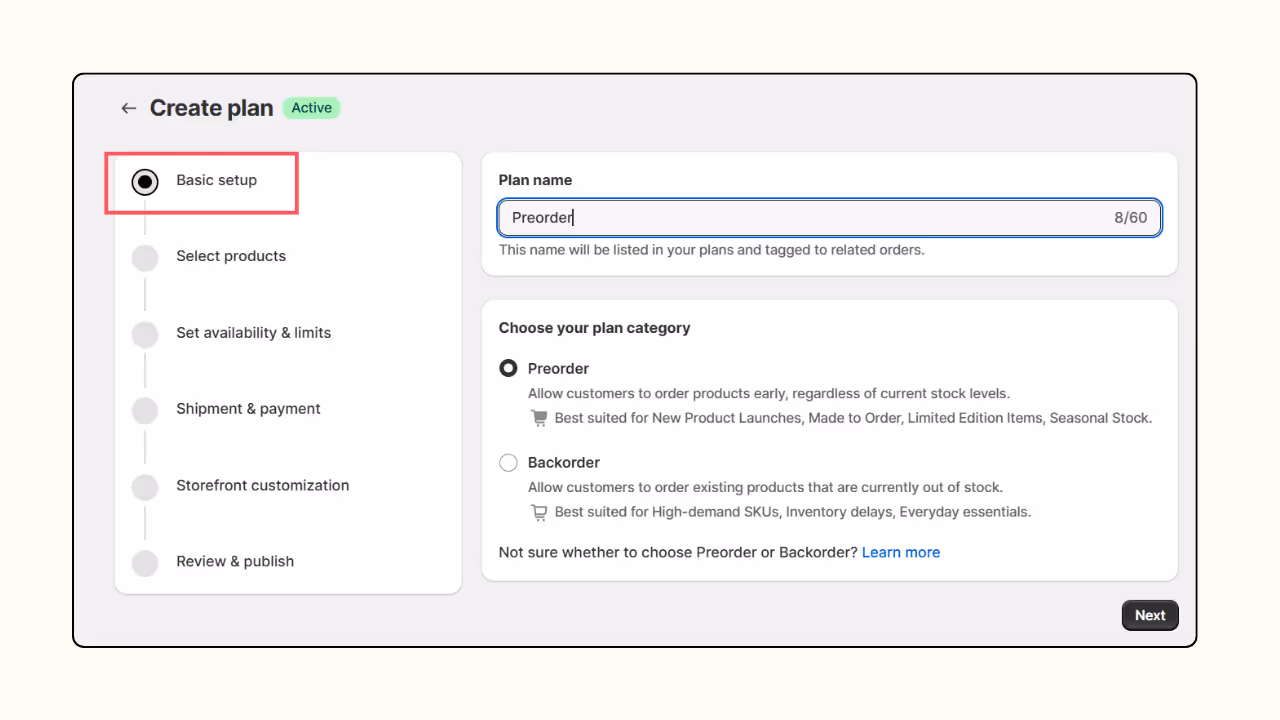
Step 3: Basic setup
Enter a plan name, choose Preorder under the plan category, and press Next.
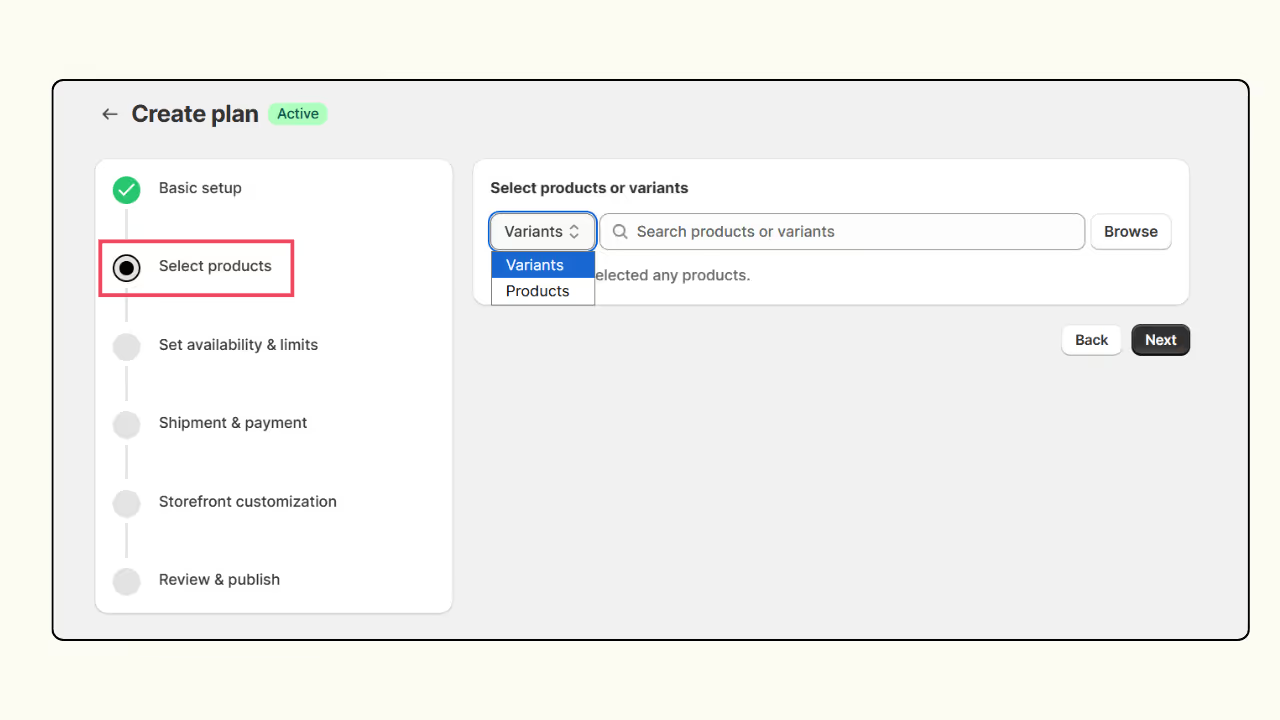
Step 4: Select products
Choose the product or specific variant for preorder. You can also add multiple products for preorders.
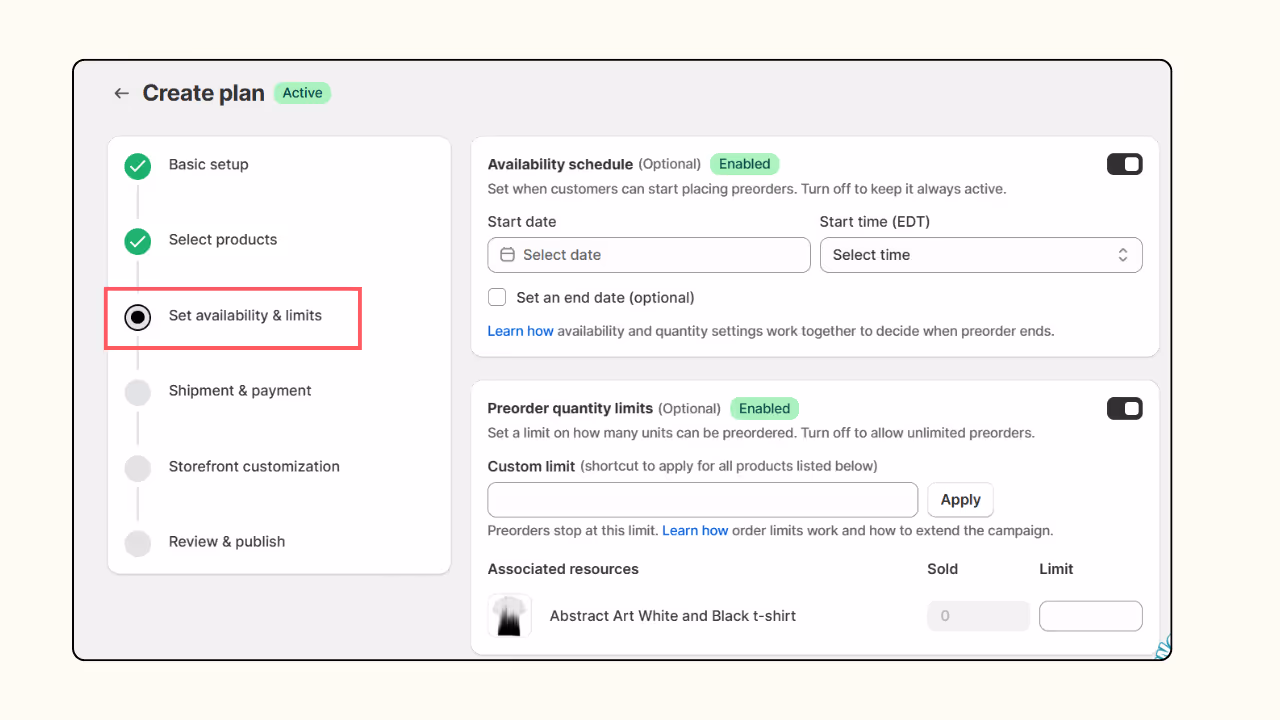
Step 5: Set availability & limits
Optionally, you can also run the preorder campaign for a limited period of time or for a limited quantity.
Choose a start & end date for the campaign and set a quantity limit.
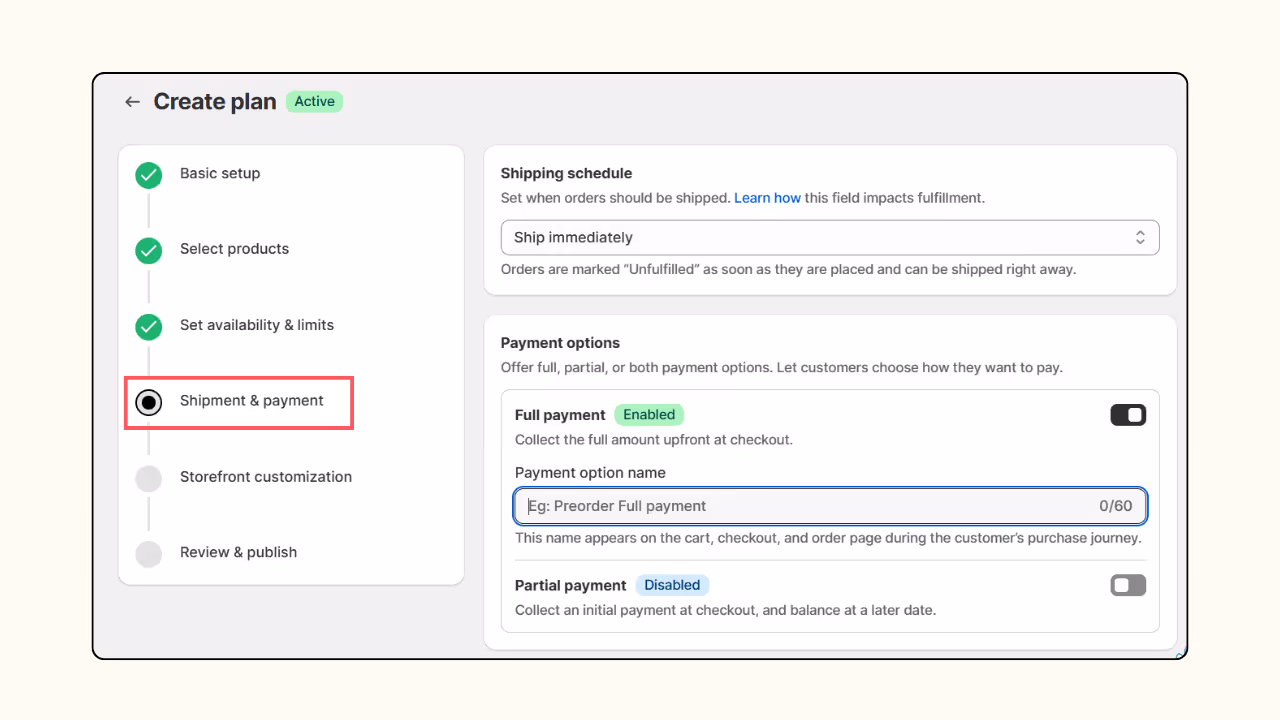
Step 6: Shipment & payment
Choose a shipping schedule and set payment methods. For payments, enter a suitable name, label, and description.
For payments, you can choose full and partial payments, then enter a suitable name, label, and description.
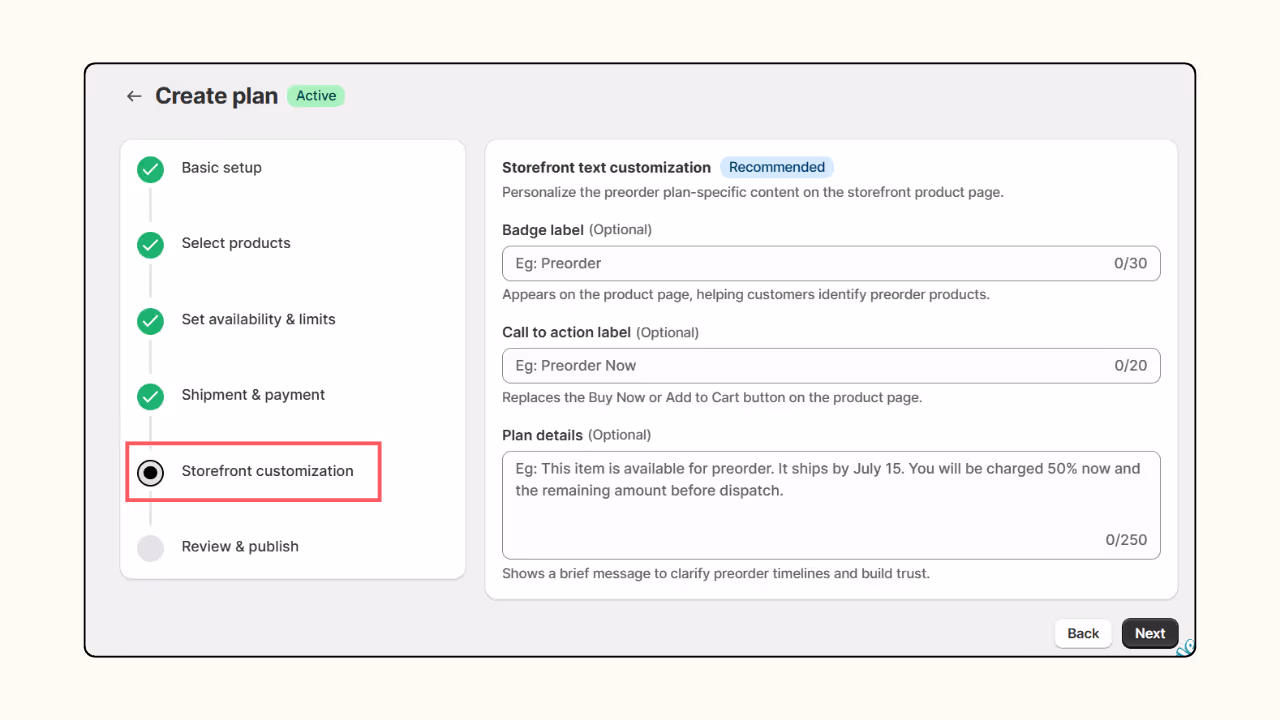
Step 7: Storefront text customization
Optionally, customize the text that appears on the badge, CTA, & plan details.
Step 8: Review and publish
The summary of the preorder campaign with all the options enabled and customized text will appear on this page. Review the preorder plan and click Create to complete the process.
Things to consider when setting up a pre order on Shopify
Before setting up a Shopify preorder, you should understand the expectations and limitations that come with it. Merchants often make a few common mistakes when setting up Shopify preorders. Here is a list of all the important things to consider.
Clearly communicate preorder status
Communication is the key - not just in relationships but in business too! Ensure you tag preorder products properly with a badge on the product, product page, and in checkout.
The 'Buy Now' or 'Add to Cart' button should be labeled 'Preorder Now' to avoid confusion.
All details about the preorder product, including its shipping, delivery timeline, and payment methods, should be clearly mentioned on the product page.
Stick to the shipping timelines
Having a fixed or at least an estimated shipping date helps build trust with customers.
If you don’t have an exact date, go with a tentative timeline. A promising “Ships before Christmas” sounds better than a vague “Ships as soon as available.”
Send out timely updates and reminders to keep your customers informed at all times. This helps with increasing their loyalty as well as your credibility.
Flexible payment methods
For preorders, having flexible payment methods is always a game-changer.
Some customers might feel more comfortable with paying a small advance rather than paying the whole amount upfront for a product that’s still in production.
On the other hand, you can encourage customers to pay in full with a special discount.
In either case, customers should have a choice, and that makes all the difference when it comes to preorders.
Set a cancellation & refund policy
With preorders, it's better to have a cancellation and refund policy in place and be open about it.
Can customers cancel if there is a delay in shipping? Do you offer a full refund?
Ensure all information is available right on the product page to avoid confusion and disputes in the future.
Monitor inventory limits
Apps like Dibs come with an in-built quantity limit feature.
Say you plan to sell only 100 units as preorders. Once the limit is reached, your customers cannot buy more, and a pop-up cart warning will be displayed.
If you haven’t set a quantity limit, then be mindful of your orders. If the number goes beyond manageable, pause your preorder campaign or change your shipping timeline.
Be prepared for delays
A mishap in production is always a possibility. So be prepared for delays when it comes to preorders.
It could be your manufacturer, your dealer, or even your delivery partner’s mistake, but you are solely responsible for your customers.
Send out timely emails to every customer regarding the delay.
If necessary, offer incentives such as store credit, a coupon code, or a free cancellation and full refund for those who wish to cancel.
How to set up pre order on Shopify without an app?
While Shopify doesn’t offer a native preorder option, there are ways to set up preorders on Shopify without using an app. Follow the steps below to do it on your own.
Step 1: On your Shopify admin, navigate to Settings.
Step 2: From the side menu bar, select Payments.
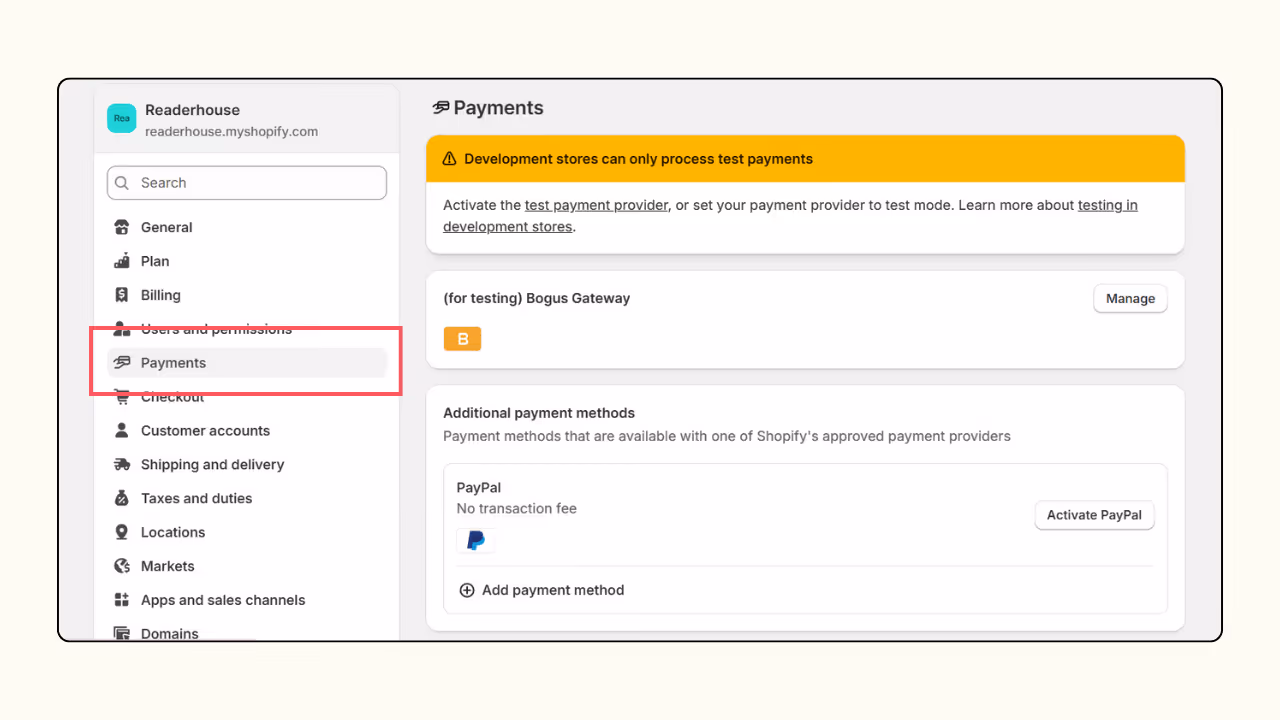
Step 3: Scroll down to Payment capture method, choose Manually, and press Save.
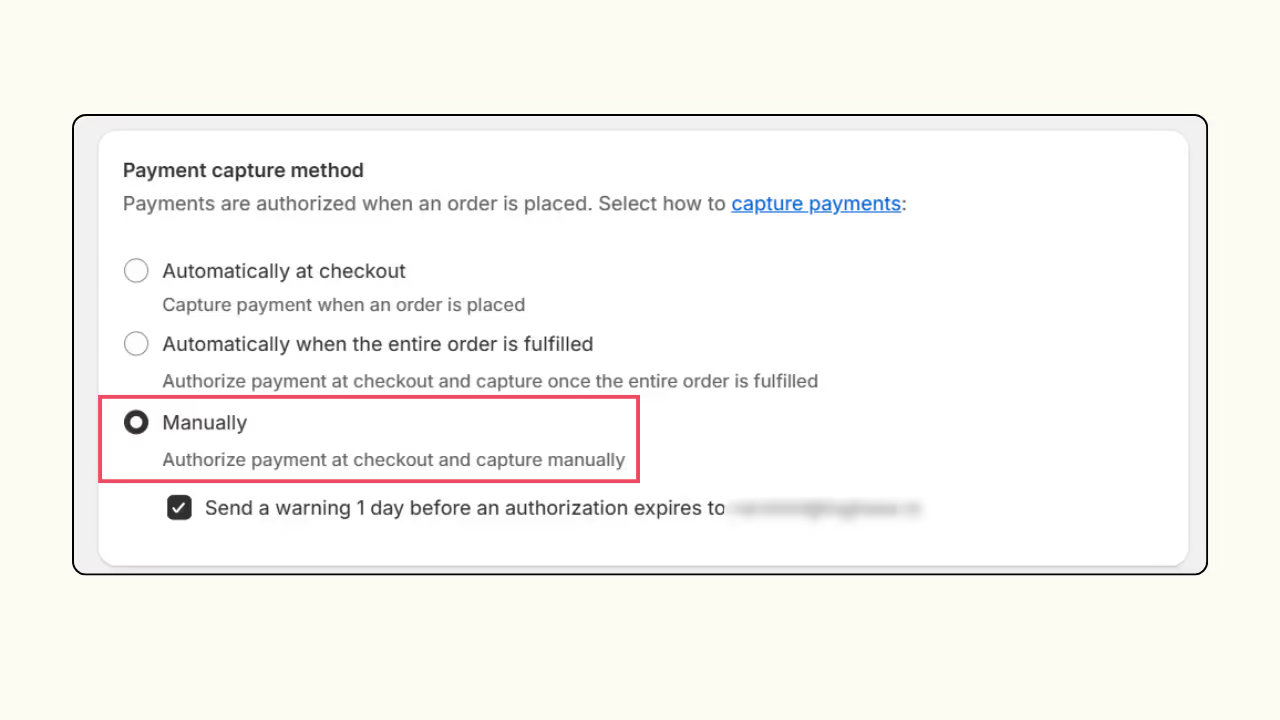
(If you see Manage under the Payment capture method, press Manage and then choose Manually)
Step 4: Go back to the Shopify admin home page, click on Products, and choose the product you wish to enable preorder.
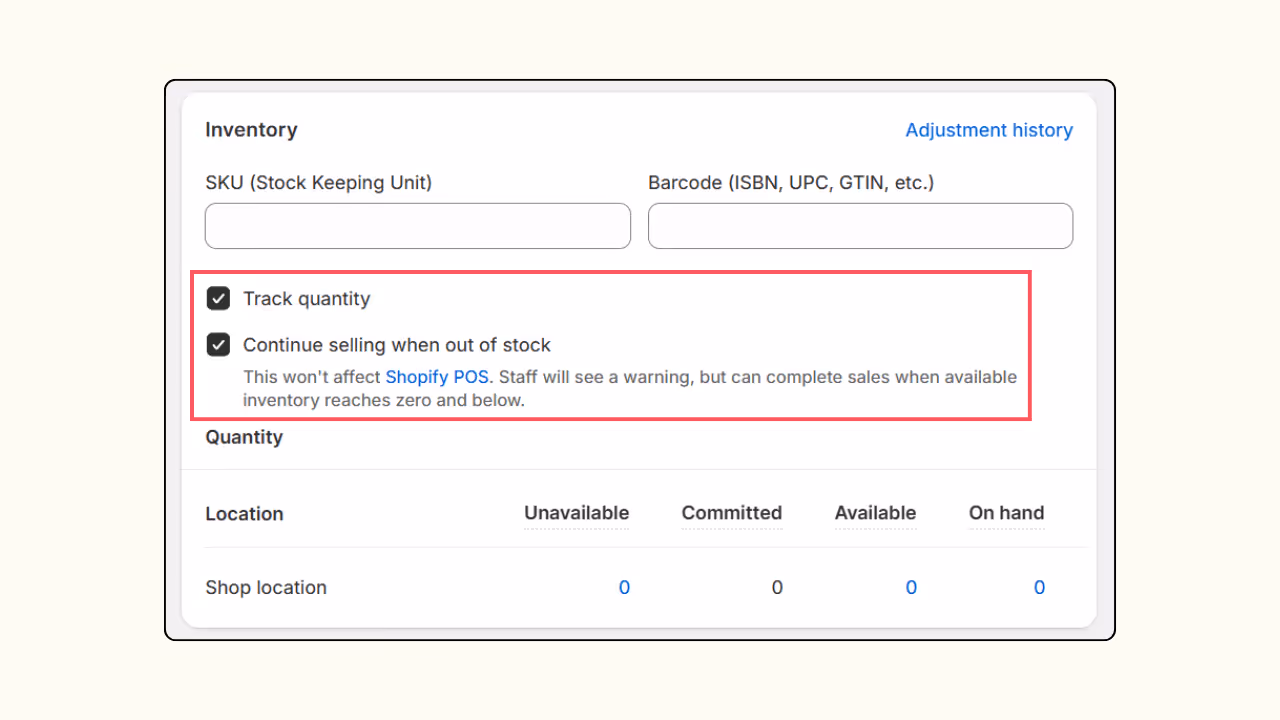
Step 5: Under Inventory, ensure you have turned on Track quantity and then enable Continue selling when out of stock. Finally, press Save.
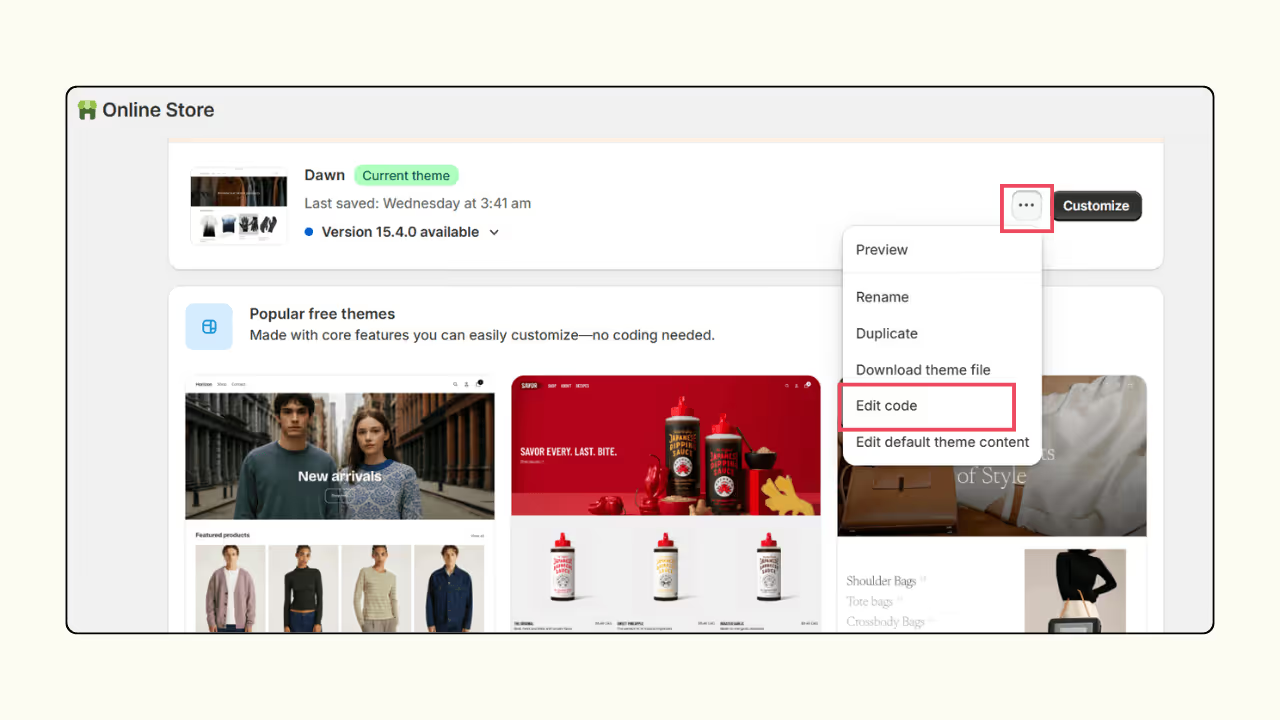
Step 6: Go back to the Shopify admin, click on the Online Store option, and choose Themes.
Step 7: Click on the More button (Three dots) near the Customize button. From the options displayed, click on Edit Code.
Step 8: From the side panel, click on Template, and click the Add file icon on top.
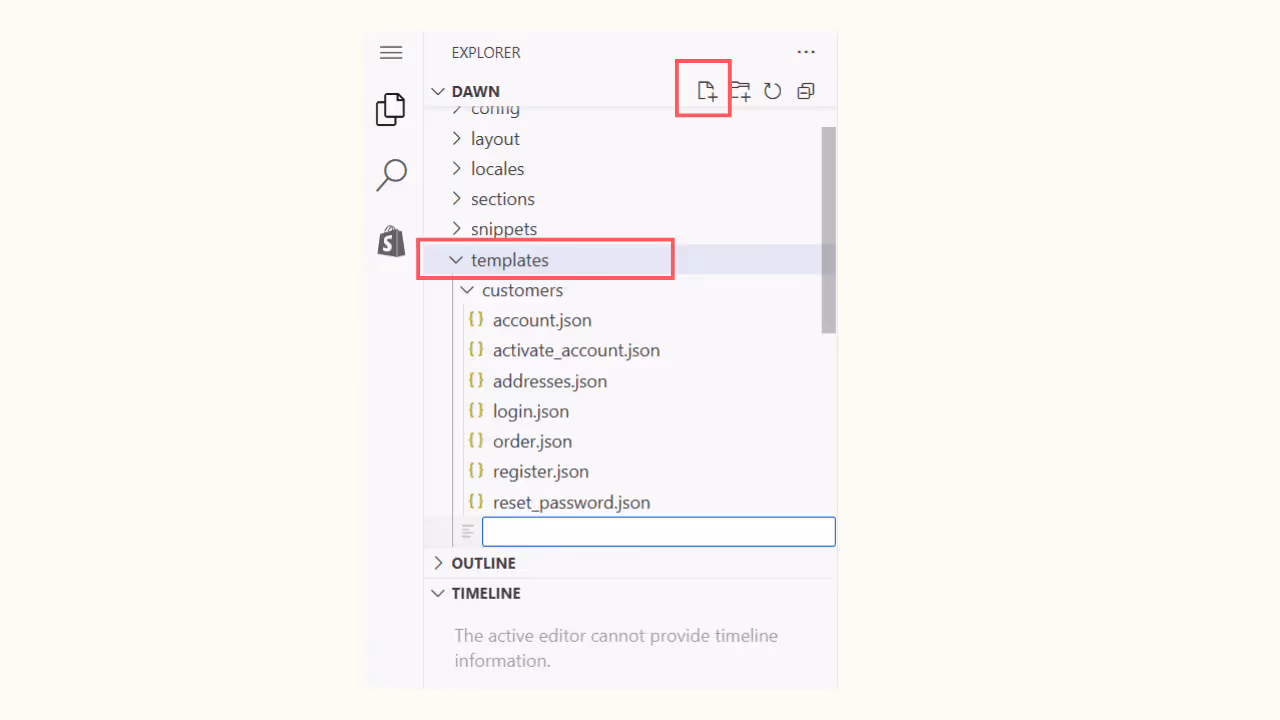
Step 9: Name your file in the JSON format, and the file will open on the right panel.
It should be in the format: product.file name.json
Example: product.preorder.json
Step 10: If you are familiar with coding, enter the preorder template code there and click Save. I have added sample code below for your reference.
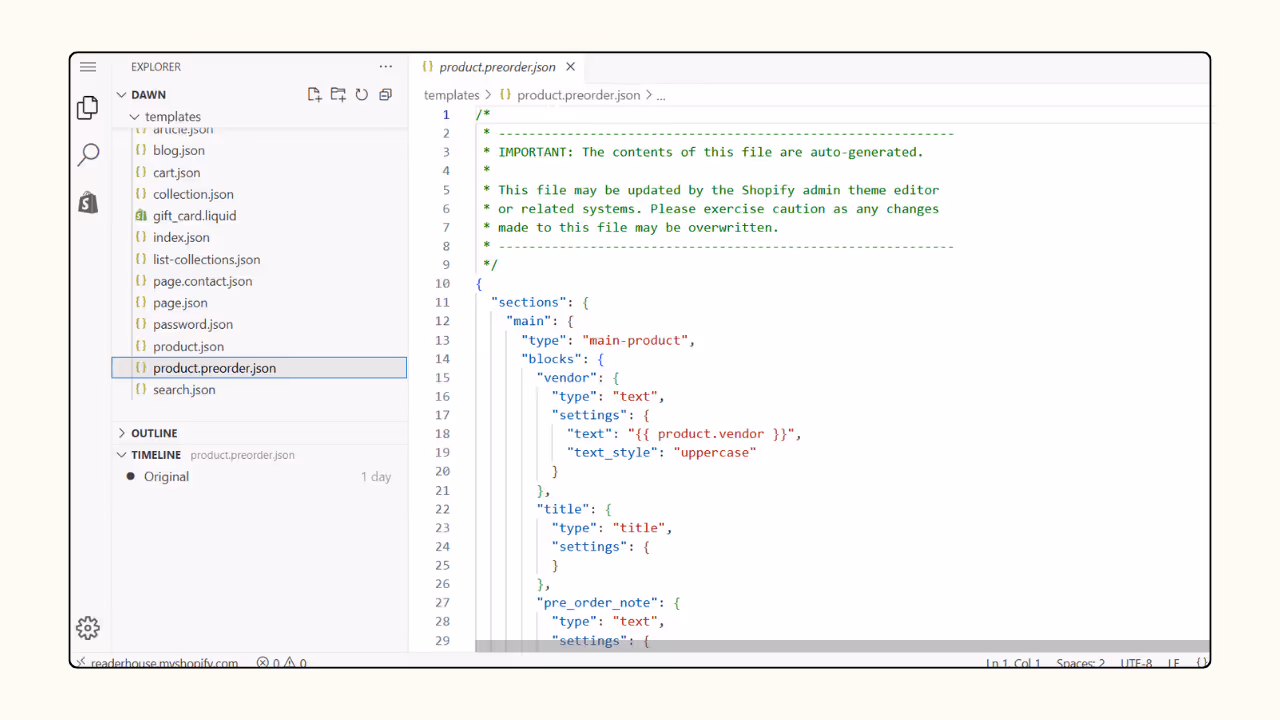
{
  "sections": {
    "main": {
      "type": "main-product",
      "blocks": {
        "vendor": {
          "type": "text",
          "settings": {
            "text": "{{ product.vendor }}",
            "text_style": "uppercase"
          }
        },
        "title": {
          "type": "title",
          "settings": {
          }
        },
        "pre_order_note": {
          "type": "text",
          "settings": {
            "text": "This item is available for pre-order. Please check the description for the expected availability date.",
            "text_style": "italic"
          }
        },
        "price": {
          "type": "price",
          "settings": {
          }
        },
        "variant_picker": {
          "type": "variant_picker",
          "settings": {
            "picker_type": "button"
          }
        },
        "quantity_selector": {
          "type": "quantity_selector",
          "settings": {
          }
        },
        "buy_buttons": {
          "type": "buy_buttons",
          "settings": {
            "show_dynamic_checkout": true,
            "show_gift_card_recipient": true
          }
        },
        "description": {
          "type": "description",
          "settings": {
          }
        },
        "share": {
          "type": "share",
          "settings": {
            "share_label": "Share"
          }
        }
      },
      "block_order": [
        "vendor",
        "title",
        "pre_order_note",
        "price",
        "variant_picker",
        "quantity_selector",
        "buy_buttons",
        "description",
        "share"
      ],
      "settings": {
        "enable_sticky_info": true,
        "color_scheme": "background-1",
        "media_size": "medium",
        "constrain_to_viewport": true,
        "media_fit": "contain",
        "gallery_layout": "stacked",
        "media_position": "left",
        "image_zoom": "lightbox",
        "mobile_thumbnails": "hide",
        "hide_variants": false,
        "enable_video_looping": false,
        "padding_top": 24,
        "padding_bottom": 24
      }
    },
    "related-products": {
      "type": "related-products",
      "settings": {
        "heading": "You may also like",
        "heading_size": "h2",
        "products_to_show": 4,
        "columns_desktop": 4,
        "color_scheme": "background-1",
        "image_ratio": "adapt",
        "image_shape": "default",
        "show_secondary_image": false,
        "show_vendor": false,
        "show_rating": false,
        "columns_mobile": "2",
        "padding_top": 36,
        "padding_bottom": 68
      }
    }
  },
  "order": [
    "main",
    "related-products"
  ]
}
Step 11: Go back to the admin homepage and select Products from the side panel, and click on the product you wish to add for preorder.
Step 12: Scroll down to the Theme template, from the options listed, choose your file name, and press Save.
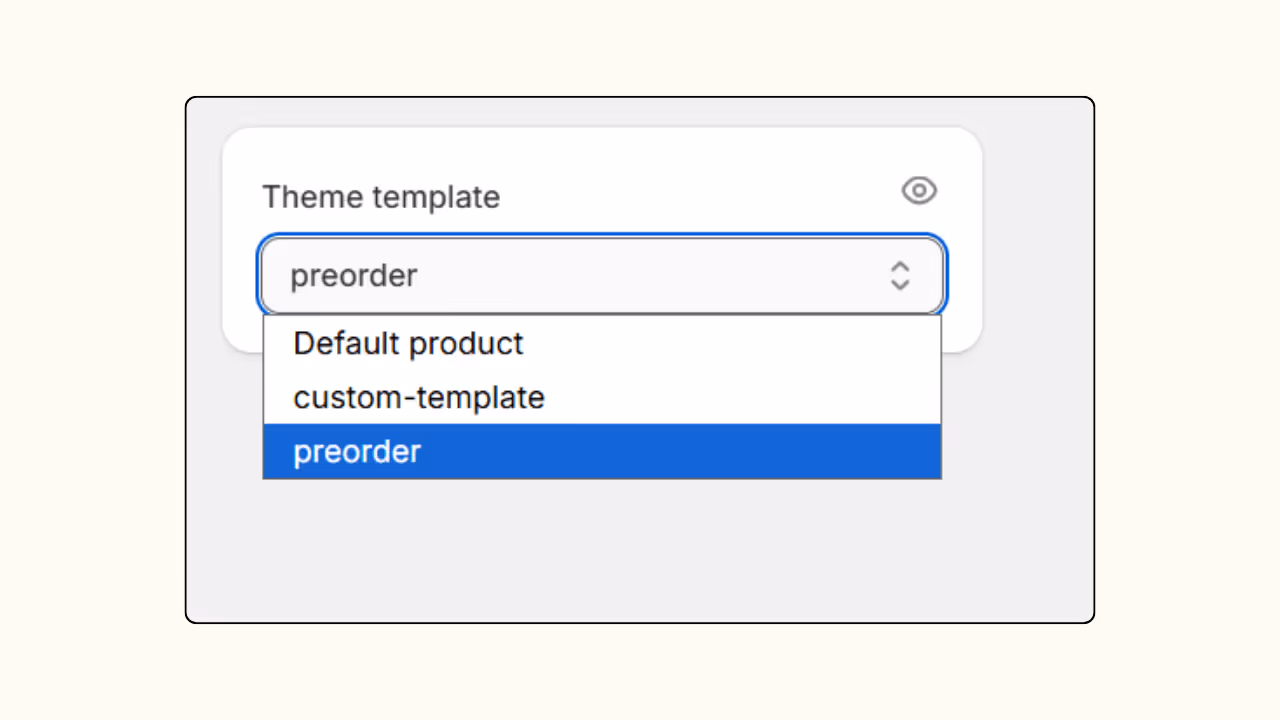
That’s it. Your product is ready for preorder. But if you wish to add a preorder button, then you have to separately customize the button once again.
Best way to sell preorders on Shopify: With or without an app?
Offering per orders with and without an app has its pros and cons. Here is a comparison of both for your understanding.
To use an app or not is up to you as a merchant. Understand the limitations and advantages of both before you make a choice.
If you have tried the manual setup before and find it time-consuming, then go with a user-friendly app like Dibs.
Dibs is completely free with no hidden fees. Try it now and see the difference.
Frequently asked questions
1. How to continue selling when out of stock on Shopify?
To continue selling when products go out of stock, you can either use a preorder and backorder app like Dibs or manually change the product inventory setting.
Using an App, you can tag the products, and the app will make product tracking, scheduling, and limits simple and easier. Without an app, you will have to manually take care of everything.
2. How to change buy now to preorder in Shopify?
With a preorder app like Dibs, it is simple to change the ‘Buy now’ button to ‘Preorder’ since it's a feature that comes with the app.
But to do it manually, you should identify the code and change your theme’s code accordingly.
3. What is the best preorder app for Shopify?
There are several best Shopify preorder apps available in the app store. But the Dibs preorder app comes with advanced features, and the app is completely free.
Using Dibs, you can set flexible payment options, offer discounts for preorders, set limits, and schedule the preorder campaign within minutes.
4. How to remove Pre order on Shopify?
In the Dibs app, open the preorder plan. Under More Actions dropdown, click Disable Plan to turn off the entire plan.
If you want to remove a specific product, open the plan, go to Products, and click the cross (×) icon next to the product to remove it.
.avif)
%20(2).avif)

.avif)
.svg)
.svg)
.svg)


.svg)